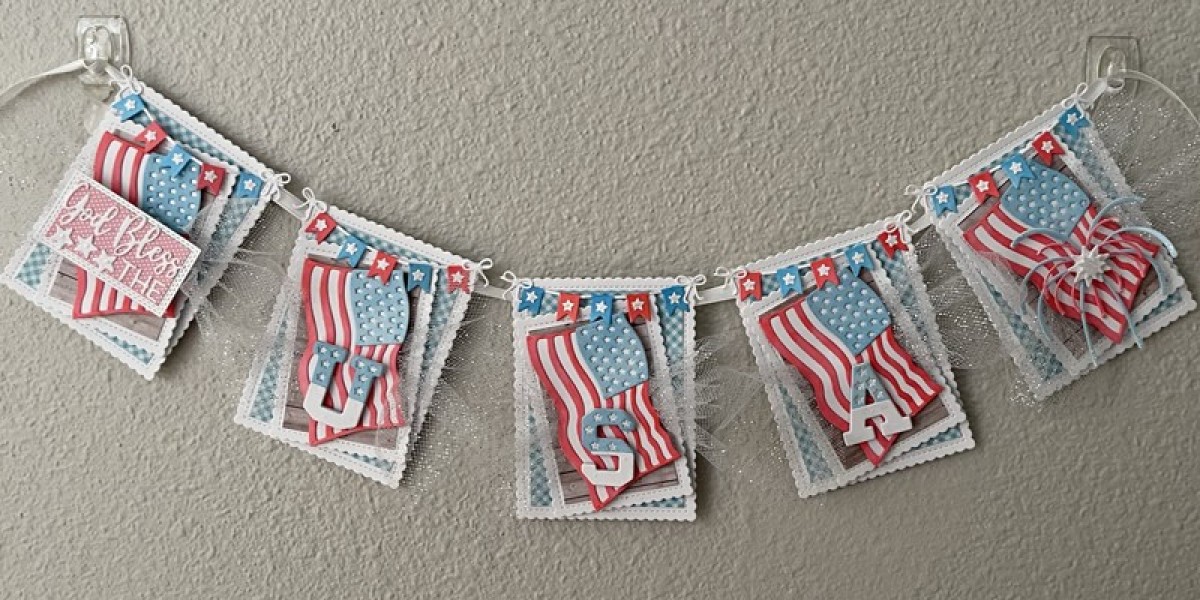
Creating personalized decor for patriotic celebrations can add a unique touch to your home or party. In this tutorial, I'll walk you through how I used the Cottage Cutz Patriotic dies to create a vibrant banner perfect for showing off your love for the USA. With detailed steps and a variety of dies, you can recreate this festive banner for any occasion. Follow along as I break down each step of the project, including the dies, colors, and techniques used to assemble this beautiful piece of patriotic decor.
Materials Used
- Cottage Cutz USA Flag Die
- USA Phrase Die
- Fireworks Dies
- Baptism Die (for the words "God" and "Bless")
- Berry Phrases Die Set (for the word "The")
- Patriotic Pennants Die
- Scallop Stitched Rectangle Dies
- Double Stitched Rectangle Dies
- White cardstock
- Digital papers (created and printed)
- Markers
- Foam tape
- Glitter tulle
- Thin ribbon
Step-by-Step Instructions
Step 1: Cutting and Coloring the Dies
The first step in creating this banner is to cut out all the elements using various dies. I used white cardstock for each die cut to give myself flexibility in adding color later. The USA Flag, USA Phrase, and Fireworks dies were the primary elements, providing a strong patriotic theme. Once cut, I used markers to color the flags in red, white, and blue, bringing them to life with vibrant hues. Coloring your die cuts by hand allows you to customize each element and ensure it fits your overall design.
Step 2: Preparing the Banner Bases
For the banner bases, I used two layers of scallop-stitched rectangles to add dimension and sturdiness. The double-layered scallop design gave the banner a more polished and structured look, perfect for hanging on the wall. The words "God" and "Bless" came from the Baptism Die set, while "The" was sourced from the Berry Phrases die set. These words added a spiritual and meaningful touch to the patriotic banner.
Step 3: Adding Digital Papers and Dimension
To give the banner an extra flair, I used some digital papers that I designed and printed myself. These papers were used as mats behind the die-cut elements, giving the banner a custom background. I added a second layer of foam tape to raise the smaller mat layer, setting it at an angle for an interesting visual effect. The foam tape not only adds depth but also creates shadows, enhancing the three-dimensional feel of the entire banner.
Step 4: Assembling the Banner
To assemble the banner, I began by layering the die cuts onto the mats, starting with glitter tulle between the mat and the flag die for a subtle sparkle. I then layered the words "God Bless The" onto a double-stitched rectangle die, again using more of my digital papers for an added personal touch. The final step in this stage was adding stars from the Fireworks die to embellish the banner, creating a fireworks-like effect in the background.
Step 5: Decorating the Pennants
Next, I used the Patriotic Pennants die to create alternating red and blue pennants, which I decorated with small stars and a dot of glitter for extra sparkle. I placed a star in the center of each pennant, making the overall design cohesive and visually appealing. At each corner of the banner, I added a cute bow cut from the Patriotic Pennants die, further enhancing the festive feel.
Step 6: Adding Foam Tape for Lift
To create even more dimension, I used foam tape between layers. Each die-cut letter (in "USA") was stacked with several layers for added depth. I attached these letters to the bottom portion of each flag on the banner, allowing them to stand out prominently. The foam tape provided just the right amount of lift without overwhelming the design.
Step 7: Hanging the Banner
Once all the elements were assembled, I adhered the individual pennants to a thin ribbon, using small bows from the Patriotic Pennants die to decorate the corners. Instead of punching holes in the corners to thread the ribbon through, I opted to glue the pennants directly to the ribbon, leaving room for the adorable bow details. This method not only looks cleaner but also adds an extra layer of decorative charm.
Final Display
After completing the banner, I hung it on the wall of my office desk, where I can enjoy it throughout the patriotic season. The banner adds a festive touch to the room, and I'll move it to join the rest of my patriotic decor over the weekend.
Conclusion
This Cottage Cutz Patriotic Banner is a fun and creative way to add a personal touch to your holiday decorations. By using a mix of dies, hand-colored elements, and digital papers, you can make your banner unique and special. Whether you hang it in your home or use it as party decor, this project will surely bring a sense of patriotism and pride to any space.
business cards cricut
Mega SVG Bundle
butterfly images for cricut
Cricut Design
cricut designs free download
disney cricut shirt ideas