Creating a stunning epoxy resin coffee table can completely transform the ambiance of your living room. Whether you're into minimalist aesthetics or bold designs, crafting your own epoxy resin coffee table can result in a truly unique, one-of-a-kind piece that speaks to your style. This epoxy resin coffee table will guide you through each step, ensuring that your table not only looks beautiful but also stands the test of time.
Introduction: Why Choose an Epoxy Resin Coffee Table?
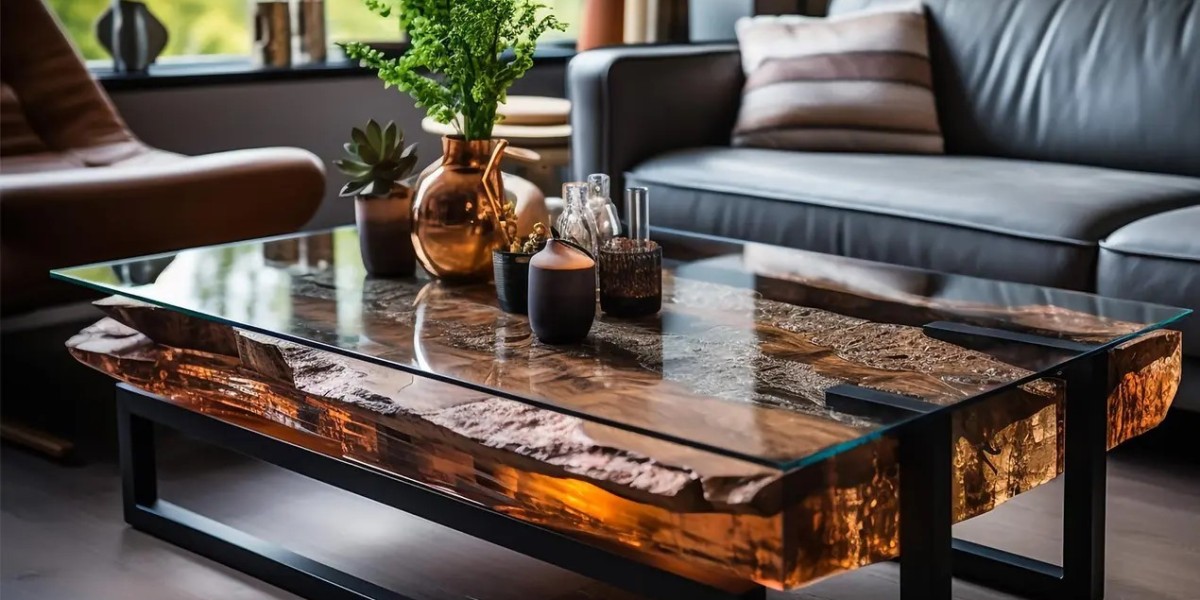
When it comes to modern furniture ideas, epoxy resin coffee tables stand out. The beauty of resin is that it combines durability with artistic creativity, allowing for endless design possibilities. Unlike traditional wooden tables, an epoxy resin coffee table offers a smooth, glossy finish, creating a vibrant centerpiece for your living space. Moreover, the ability to mix colors, materials, and textures within the resin makes it possible to design something that fits perfectly into your home décor.
Essential Materials for Your Epoxy Resin Coffee Table
To start your epoxy table tutorial, gathering the right materials is crucial. Here’s a list of everything you’ll need to make your epoxy resin coffee table:
Epoxy resin (both the resin and hardener)
Wooden slab or a base of your choice (can be live-edge wood, MDF, or any other material)
Measuring cups and mixing sticks
Protective gloves and mask (to ensure safety when working with resin)
Torch or heat gun to eliminate bubbles in the resin
Color pigments or dyes (for adding color to the resin)
Painter’s tape or a mold (if you're going for a specific shape or design)
Sandpaper (for finishing the edges)
Polishing compound (for a smooth, glossy finish)
Having all the materials ready will ensure a smooth process when creating your epoxy resin coffee table.
Step 1: Preparing the Wooden Slab or Base
The first step in this epoxy table tutorial is preparing the base for your table. Start by sanding the wooden slab (or other material) to remove any rough spots or imperfections. If you’re using a live-edge wood piece, be sure to clean it thoroughly to remove dirt and debris. Apply painter’s tape around the edges to avoid the resin spilling over and to create a clean line.
Subheading: Choosing the Right Wood for Your Table
The type of wood you choose can significantly impact the final look of your epoxy resin coffee table. For a rustic feel, live-edge wood is a great option. If you prefer a sleek, modern design, opt for a smooth, polished wood slab. Each type of wood will create a different texture and overall look once the resin is applied.
Step 2: Mixing the Epoxy Resin
Now comes the fun part – mixing the resin! Follow the manufacturer's instructions carefully to ensure the right ratio of resin to hardener. Typically, the mixture is 1:1 by volume, but always double-check. Use a mixing stick to combine the two components and stir slowly for 3 to 5 minutes. You want to make sure the mixture is thoroughly combined, but without introducing too many air bubbles.
Subheading: How to Avoid Common Resin Mixing Mistakes
To avoid common mistakes when mixing epoxy, make sure to use a clean container and stir in a slow, deliberate motion. Quick stirring can cause air bubbles, which can interfere with the smooth finish of your epoxy resin coffee table.
Step 3: Adding Color and Effects
This is where you can get creative with your epoxy resin coffee table. Add color pigments or dyes to the resin mixture, ensuring an even distribution of color. If you’re aiming for a marble effect, you can swirl different colors of resin together to create a dynamic design. You can also embed items like dried flowers, stones, or metallic flakes into the resin for added texture and visual appeal.
Subheading: Creative Design Tips for Your Epoxy Resin Table
If you want to make your best online shopping platform in Pakistan even more striking, consider incorporating design elements that reflect your personality. Think about creating ocean-inspired swirls, geometric patterns, or even natural-looking elements like tree rings or river-like streams running through the table.
Step 4: Pouring the Resin
Once your resin is mixed and the color is added, it’s time to pour it onto the wood slab. Start from one corner and slowly pour the resin to cover the entire surface. Use a heat gun or torch to eliminate any bubbles that may have formed during the pour. Continue pouring in layers, allowing each layer to cure before adding the next. This will ensure that the resin cures evenly and prevents issues with uneven surfaces.
Subheading: How to Prevent Resin from Dripping Over the Edges
To keep your resin from dripping over the edges, make sure that the painter's tape is securely applied around the perimeter. You can also use a mold if you want to create specific shapes and prevent unwanted spills.
Step 5: Curing the Epoxy Resin
Once the resin has been poured, it’s crucial to allow it to cure properly. The curing process can take anywhere from 24 to 72 hours, depending on the thickness of the resin and the ambient temperature. During this time, avoid touching the surface to prevent fingerprints or imperfections. After the resin has cured, remove the painter’s tape and check for any rough edges.
Subheading: Understanding Resin Curing Time
Epoxy resin curing time can vary based on factors like temperature and humidity. To ensure the best results, it’s important to allow the resin to cure in a warm, dry environment. Be patient—rushing the curing process could result in a less durable finish.
Step 6: Sanding and Finishing the Surface
After the resin has fully cured, it’s time to smooth out the surface. Start by sanding the edges of the table with coarse sandpaper, and gradually work your way to finer grits to achieve a smooth, even surface. Once sanded, polish the surface with a resin polishing compound for a glossy, professional finish.
Subheading: Tips for Achieving a High-Gloss Finish
If you want to achieve that signature glossy shine, be sure to apply the polish in a circular motion, allowing it to dry fully before buffing it with a soft cloth.
Step 7: Attaching the Legs
The final step is attaching the legs to your epoxy resin coffee table. Choose legs that complement the design and height of your table. Whether you opt for metal, wood, or hairpin legs, make sure the legs are securely attached and properly aligned to prevent wobbling.
Subheading: Choosing the Right Legs for Your Table
For a rustic look, wooden legs can complement the natural aesthetic of the resin. Alternatively, metal legs are ideal for a more modern, industrial feel. Choose based on your personal style and the overall vibe you want to achieve in your living space.
Why an Epoxy Resin Coffee Table Will Elevate Your Space
Once you’ve completed your epoxy table tutorial, you’ll have a unique resin coffee table that is sure to elevate your space. Whether you choose a bold color palette or a subtle, natural design, an epoxy resin coffee table brings sophistication, durability, and creativity into your home. Its one-of-a-kind design ensures it will become the centerpiece of your living room, sparking conversation and admiration from your guests.
Read Also: Epoxy Resin Coffee Table Designs You Need to See
Conclusion
Creating an epoxy resin coffee table is a rewarding and creative project that can bring your living space to the next level. With the proper materials, patience, and attention to detail, you can craft a stunning table that reflects your personal style while providing a functional and durable piece of furniture. Whether you’re a seasoned DIYer or a beginner, this epoxy table tutorial offers all the guidance you need to create a masterpiece that will elevate your home for years to come.