Replacing a faulty door handle may seem like a difficult task, but it is actually one of the easiest home maintenance jobs you can complete yourself. Whether your handle has become loose, broken, or difficult to operate, installing a new one can improve both the appearance and security of your door. With a few basic tools and careful measurements, you can complete the job in less than an hour without calling a professional.
This guide explains the entire replacement process from start to finish, helping you avoid common mistakes while ensuring your new handle fits perfectly.
Why Replace Your Door Handle?
Over time, regular use causes wear and tear on door hardware. A handle that once operated smoothly may become stiff, wobbly, or fail to engage the locking mechanism properly. Replacing it promptly helps maintain security and prevents further damage to the locking system.
Common reasons for replacement include:
- Loose or wobbly handles
- Broken springs that prevent the lever from returning
- Rust, scratches, or faded finishes
- Difficulty locking or unlocking the door
- Upgrading the appearance of your entrance
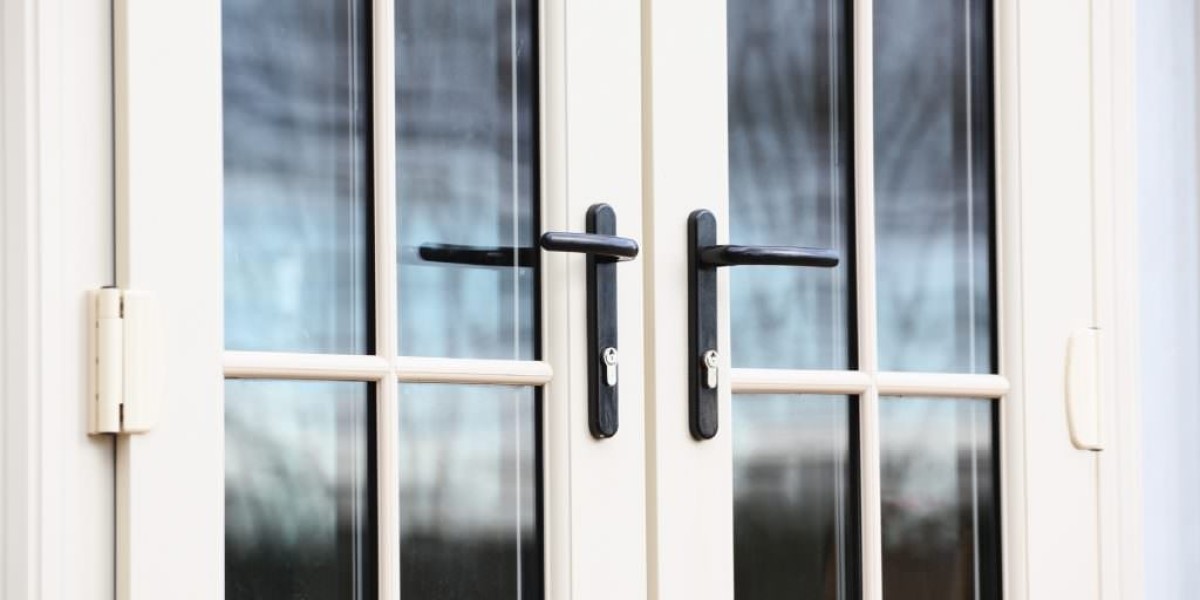
Modern uPVC door handles are available in various finishes and styles, making it easy to match your home's design while improving functionality.
Tools You'll Need
Before starting, gather the following tools:
- Phillips screwdriver
- Flat-head screwdriver
- Tape measure
- Allen key (if required)
- Replacement handle
- Soft cloth
- Pencil for marking measurements
Having everything ready before you begin makes the process much smoother.
Step 1: Identify the Correct Replacement Handle
Not every handle fits every door. Before purchasing a replacement, measure the existing hardware carefully.
Important measurements include:
- Screw fixing centres
- Backplate length
- Distance between the handle spindle and keyhole (PZ measurement)
- Overall width
Many manufacturers provide sizing charts that make matching your existing handle much easier.
Step 2: Open the Door
Always keep the door open during the replacement process. This prevents you from accidentally locking yourself out if the handle is removed while the door is closed.
Opening the door also gives you better access to both sides of the hardware.
Step 3: Remove the Fixing Screws
Locate the screws on the inside backplate of the handle.
Using a Phillips screwdriver:
- Remove the top screw.
- Remove the bottom screw.
- Keep the screws somewhere safe if they are still usable.
Once removed, gently pull both halves of the handle away from the door.
Step 4: Remove the Spindle
After separating the handle, you'll see a square metal spindle running through the lock mechanism.
Simply slide the spindle out.
Inspect it for:
- Bending
- Rust
- Excessive wear
If your new handle includes a replacement spindle, it's generally best to use the new one.
Step 5: Clean the Door Surface
Before installing the new hardware, clean the exposed area around the fixing holes.
Use a soft cloth to remove:
- Dirt
- Dust
- Old grease
- Moisture
A clean surface allows the new handle to sit flush against the door.
Step 6: Insert the New Spindle
Slide the new spindle through the centre of the lock mechanism.
Make sure it passes evenly through both sides of the door.
It should move smoothly without excessive resistance.
Step 7: Position the New Handle
Align the exterior section of the replacement handle over the spindle.
Then place the interior section onto the opposite side.
Ensure:
- Screw holes line up correctly
- The handle sits flat against the door
- The keyhole aligns properly with the lock cylinder
Take your time with this step to prevent misalignment.
Step 8: Tighten the Screws
Insert the fixing screws supplied with the replacement handle.
Tighten them gradually by alternating between the top and bottom screws.
Avoid overtightening, as excessive force can damage the backplate or distort the handle alignment.
The handle should feel secure without being overly tight.
Step 9: Test the Handle
Before closing the door, test every function.
Check that:
- The lever returns smoothly.
- The latch retracts fully.
- The lock operates correctly.
- The key turns freely.
- The door opens and closes without resistance.
If something feels stiff, slightly loosen the screws and realign the handle before tightening again.
Common Mistakes to Avoid
Replacing a handle is straightforward, but a few common mistakes can cause unnecessary problems.
Buying the Wrong Size
Incorrect measurements are the biggest cause of installation issues. Always measure carefully before ordering a replacement.
Overtightening Screws
Many people tighten screws as much as possible, believing it improves security. In reality, excessive tightening can restrict handle movement.
Forgetting to Test Before Closing
Always check the handle while the door remains open. This simple step can prevent accidental lockouts.
Ignoring Lock Alignment
If the handle doesn't sit squarely, it may place unnecessary strain on the locking mechanism over time.
Maintenance Tips
A new handle will last much longer with simple routine maintenance.
Every few months:
- Wipe the handle with a damp cloth.
- Avoid harsh chemical cleaners.
- Lubricate the moving parts using a silicone-based lubricant.
- Tighten any loose screws.
- Inspect for signs of corrosion or damage.
Regular care keeps the mechanism operating smoothly for years.
When Should You Replace Instead of Repair?
Minor issues such as loose screws can often be fixed without replacing the entire handle.
However, replacement is usually the better option when:
- The spring mechanism has failed.
- The handle is cracked.
- Corrosion is severe.
- Internal components are worn out.
- The finish is badly damaged.
New uPVC door handles are relatively affordable and often provide a longer-lasting solution than repeated repairs.
Choosing a Quality Replacement
Not all replacement handles offer the same level of durability.
When shopping, look for features such as:
- Corrosion-resistant materials
- Strong spring mechanisms
- Secure fixing points
- High-quality finishes
- Manufacturer warranty
A well-made handle improves reliability while maintaining the security of your home.
Final Thoughts
Replacing a door handle is a practical DIY project that requires only basic tools and a little patience. By measuring correctly, selecting a compatible replacement, and following each installation step carefully, you can restore smooth operation and enhance your home's appearance in less than an hour.
Routine maintenance will help your new hardware continue performing reliably for years, reducing the likelihood of future repairs. Whether you're replacing worn-out fittings or upgrading your entrance, installing new uPVC door handles is an easy way to improve both function and style without the expense of hiring a professional.